How to propagate thuja by cuttings at home: in spring, summer, autumn, winter, easy and quick ways, step by step instructions
Content:
Thuja is a monoecious, coniferous plant. It comes from the cypress family. The family itself has 5 species. This always green plant came to us from North America and East Asia. In its historical homeland, this plant reproduces either by seed or vegetatively. But at a time when thujas are used for landscape design, they are propagated mainly by cuttings. It is much easier and faster than growing thujas from scratch by planting them with seeds. And you don't need to spend finances to buy young seedlings. But in order to grow plants from cuttings, you need to know how to do it correctly. How to propagate thuja by cuttings - and our article will tell.
How to propagate thuja by cuttings correctly. Other breeding methods
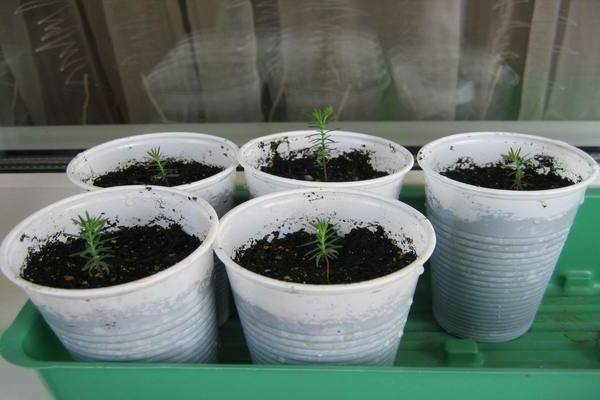
Thuja propagation by seeds
For reproduction of thujas, there are only several methods: you can do it by seeds or grow a whole tree or bush from a simple twig.
Of course, when plants are grown from seeds, they grow stronger and healthier. But in time it takes quite a long time, because the thuja themselves grow very slowly.
Although absolutely any plants can be propagated by seeds, this method has one significant drawback: plants grown from seeds never correspond to the plants from which these seeds were taken. And plants grown in this way easily lose most of their original properties.
Growing a plant from twigs also has its drawbacks. For example, not all plants survive in this case. Of course most of them, but not all.
If growing a thuja from seeds takes about five years for a gardener, then if you grow a thuja using cuttings, it will be much faster. In a couple of years, young seedlings will delight you.
At this time, they can already be used for landscaping your site. Moreover, before choosing a method of reproduction of thujas, it is imperative to take into account the fact that plants grown by cuttings develop much faster, adapt to any weather conditions and to the composition of the earth than those grown from seeds.
How to propagate thuja by cuttings at home. Harvesting cuttings
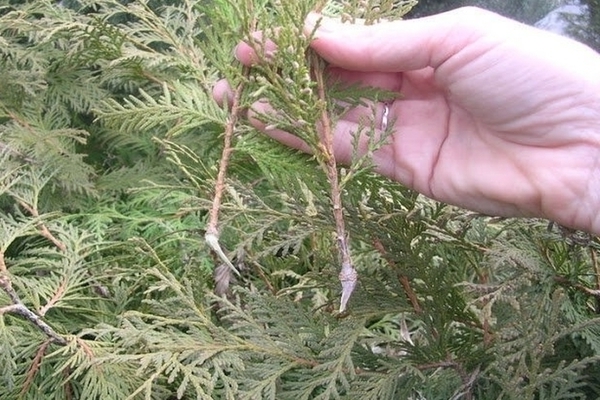
Before answering the question of how to propagate thuja by cuttings, the first step is to know how to choose them correctly. Branches should be taken only from those bushes that are not older than 3 years and have not yet had time to stiffen. It is best if these branches are no more than half a meter in length. And the weather on the day you decide to cut the cuttings will be cool. This is best done early in the morning.
Despite the fact that the process of reproduction of thuja by cuttings seems to be quite complicated to inexperienced gardeners, in fact this is far from the case. It is absolutely easy to prepare cuttings; this occupation does not take a lot of time and effort. But the main thing is that you need to do it correctly.
Cuttings from the bush should be cut in mid-April. If the cut is correct and from the right place, then soon you will be able to get a seedling from such a cutting, which will have roots in a month. But when trimming cuttings, certain rules must be followed.
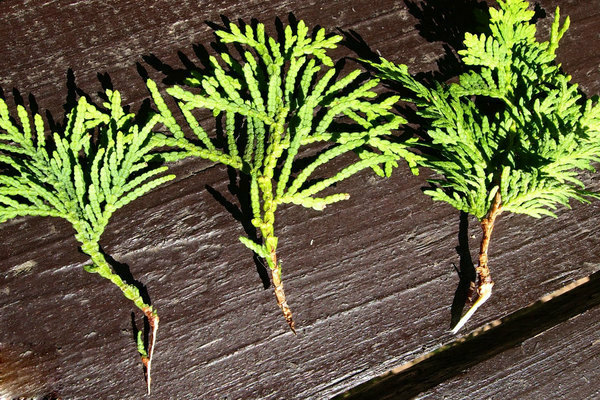
- It is advisable to cut the cuttings from the middle of the bush.The branch should be no longer than half a meter, not less than 2 years old, but not older than 3. If you cut off such a branch, then at least three cuttings can be obtained from it.
- It is imperative to cut off the cuttings with some kind of sharp tool.
- In order for the seedling to develop well, it is best to choose a cutting that has a separate branch. This twig must be torn from the plant. It is from this place that the roots will also grow later.
- Almost all leaves growing on a branch intended for cutting after cutting it are tedious to remove, leaving very little. This is done because the leaves take up the force that must be intended for root formation.
Before planting plants in the ground, it is best to treat the seedling with growth stimulants, which are sold in every gardening store. The most popular such drugs are: "Epin", "Ecopin", "Kornevin" and the like.
You need to use these funds strictly according to the instructions that are indicated on each package with the drug. Basically, the instructions say that the cutting must be dipped in this special solution. Then put it on a flat surface for half an hour so that the drug is completely absorbed.
It is best, of course, to plant immediately after you have received the cuttings. If too much time passes, the roots of the seedling can dry out easily. But even if this does not happen, then they simply can lose all their properties. And the plant will be noticeably different from the rest.
But still, if for some reason you still cannot plant the plant right away, then you can briefly wrap the cuttings in a damp cloth and put them in a cool place. But once again, we remind you that this is not for long.
How to propagate thuja by cuttings in summer, autumn, spring and winter
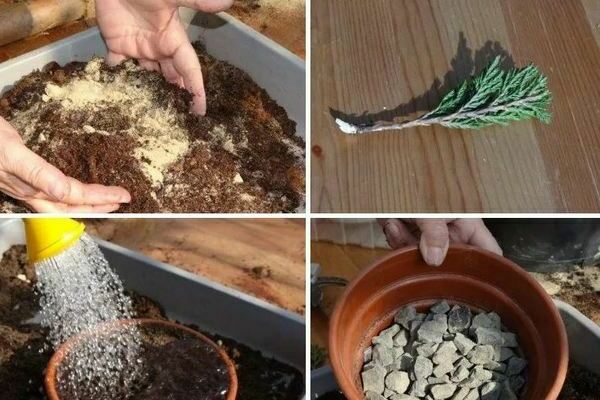
Reproduction by cuttings can be carried out absolutely at any time of the year. But the method of grafting depends on the season. It is always different.
How to propagate thuja by cuttings in the fall. Immediately after cutting, you must immediately place the cutting in such a place that it is warm enough. And also there was always enough moisture so that he could take root over the winter. And then in the spring it will already be possible to plant a seedling.
Still, the best time of the year for plant propagation is Spring... And this is considered for a number of reasons:
- After the snow melts, the plant wakes up and the sap begins to move. But at the same time, the leaves have not yet had time to grow. And the plant will not experience the slightest stress if you cut a few branches.
- In spring, when planting cuttings, they will feel better and be able to root more easily. This is because the weather and temperature are the most optimal at this time. The best conditions for the root system to actively develop. Yes, and moisture at this time is absolutely enough for them. But even if, for some reason, there is still little moisture, then it can be maintained independently.
- It is in the spring, after the cuttings of the plant take root, that the thuja can be transplanted to a normal place, where they will actively grow and develop for the next three years. In this case, they will already get strong enough before the winter period and will be able to transfer it more easily.
How to propagate thuja by cuttings summer. This is best done at the end of June. It is at this time that the second stage of growth begins. But you always need to remember that they will not begin to take root immediately, but after some time. In this case, it will be possible to transplant seedlings only next year.
Although in the event that you decide to carry out the reproduction of thuja in the summer, then the roots of such a plant will be very powerful. And over the winter they will get even stronger. Also, experienced gardeners recommend planting thuja in the same land in which the plant itself will grow in the future. Then it will take root much easier, and experience less stress.
In the reproduction of thuj in the fall a lot of nuances.Although almost all gardeners believe that autumn is the best time to carry out the cuttings procedure. And this is considered because in this case the seedlings will be stronger and can more easily adapt to the local climate.
Due to the fact that sap flow stops in autumn, the plant no longer suffers from a small amount of moisture. But there is a minus in this, the seedling takes longer to take root. If you nevertheless decide, then you need to cut the cuttings not earlier than October.
It is at this time that all the leaves from the plant begin to actively fall off. But to choose from which plant and which branches can be cut, you need to be very careful. The best shoots in this case will be those that grow on the top of the tree.
If your thuja is too tall, then cuttings can be cut from those branches that are older than three years. But if your ornamental plant is low, then the branches should be from two to three years old. It is at this age that they are best suited. After all, it was at this time that they had not yet had time to stiffen.
In the fall, the branches from the plant are cut in the same way as at any other time of the year. In the same way, for cuttings, it is better to choose those branches on which the awn is a process. And this very process should be cut off. This is done to make it easier for the roots to break through.
And remember that there should be practically no leaves on the cuttings. Autumn care for cuttings has its own rules that must be followed.
- If you nevertheless decide that it is necessary to propagate thuja with torn cuttings in the fall, and simply put them in water, then the whole care consists in the fact that it needs to be changed regularly. Otherwise, the stalk may just start to rot.
- While the water is changing, the cuttings need to be pulled out and wrapped in a wet cloth. Dirty water should be discarded and the container washed well.
- Having filled in clean water, you can add a little manganese to it for disinfection. But here the main thing is to pour quite a bit of this substance so that the water is pale pink. If you increase the concentration, then you simply risk burning the entire root system, and accordingly the entire cutting.
If grafting is carried out in such a way that the cutting sits in the ground (it is best if it is collected from the place where the seedling will grow in the future), then this soil must be regularly moistened. The best option for this would be a spray bottle.
In this case, the earth will not settle and will not be covered with a crust. Be sure to keep the humidity constant. But a little bit damp, because with an excess of moisture, the roots can simply begin to rot. Well, the consequences of this are naturally clear to everyone.
If during propagation by cuttings you do not want to mess with plants much, then the film will be the most convenient option for you. To do this, you need to take the moss, dip the end of the cutting into it, moisten well and wrap it in film. But you need to systematically monitor whether the cuttings have enough moisture. If there is no condensation on the film, then everything is in order. If it appears, then the film should be unrolled, moss moss and rewound.
Basically, and winter grafting is not at all difficult. And gardeners have much more time in winter to start propagating the plant. But alas, in winter, plants die much more often than during the rest of the year. Therefore, if you want to get a plant, you need to propagate and care for it during this period with more care.
Reproduction methods
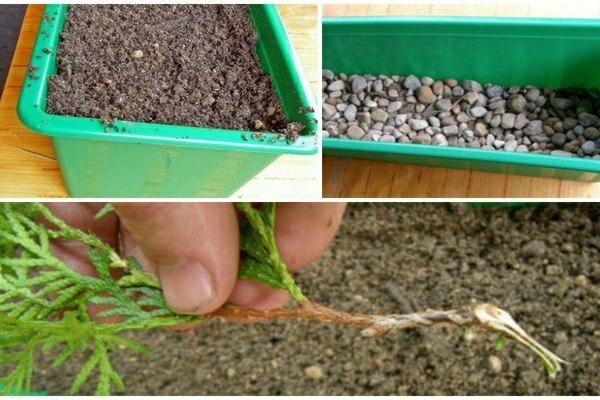
Still, there are several ways for home breeding of these always green plants, but each of them has its own characteristics.
The easiest way, of course, is to reproduce thujs. in water. This breeding option differs from the others in its unpretentiousness. Virtually no time and effort is spent on such breeding.
With this reproduction, you need to pour water into the container and put the cuttings in it. But you need to make sure that the leaves remaining on the layer do not get into the water in any case.If suddenly this happens, then they will soon simply rot.
In principle, it is not necessary to keep each stalk in a separate container. You just need to take one container of the appropriate size and put several layers in it. But it is best if there are five or fewer of them. This is simply necessary so that the cuttings have enough nutrients, which they receive from the water at this time.
The water needs to be changed regularly because over time it will become dirty and evaporate.
In order to carry out the prevention of rotting, several granules of potassium permanganate should be poured into the water. Also, watch the water level in the container, because without water, the cuttings will simply dry out very quickly.
When you change the water in the container, the cuttings should be placed in a damp cloth for this time. The container in which the cuttings are located should be kept in a cool place at all times. When the roots of the cuttings grow about five cm or more, they can be transplanted into a container with soil.
The earth must be prepared in advance. It is best if it is taken from the place in which the seedling will grow in the future. If you do as recommended, then in the future it will be much easier for the plant to root, because the plant is already accustomed to the composition of the earth.
After transplanting the cuttings into the ground, it is best to put the container in a place that is not too bright. Then the roots of the plant will develop more actively. And after a couple of months of such a cultivation of a seedling from a cutting, the plant will be completely ready for planting in open ground, in a permanent place. It is this method of reproduction of thuja that is the simplest and will be within the power of absolutely any gardener, regardless of his experience.
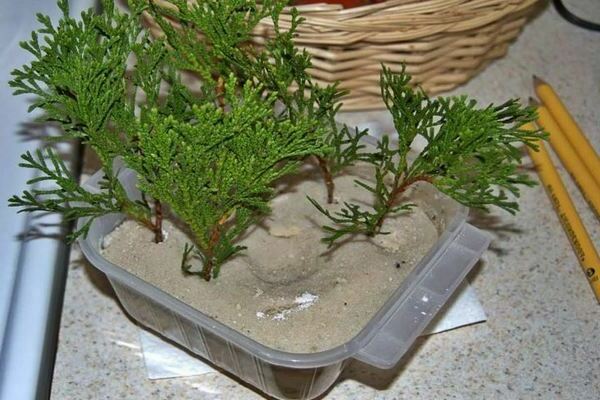
Thuja can also be propagated at home, right in the ground... It will also not be a big deal and hassle for any gardener. All that is needed for this is river sand, which was previously processed with potassium permanganate. It can be poured into a shallow pallet or directly into an open container. But for cuttings, not pure sand is used, but mixed with peat in a 1: 1 ratio.
During such cuttings, the gardener is simply obliged to constantly monitor that the soil is moist. And for this, spraying the soil from a spray bottle and wrapping the container with ordinary cling film helps a lot. In this case, moisture evaporation practically does not occur.
Please note that any container with cuttings should be in a fairly dark place. And in no case should the sun's rays fall on it.
How to propagate thuja by cuttings - auxiliary propagation methods
Thuja cuttings can also be very successfully carried out. in regular fabric. This method is generally considered one of the simplest and most effective. In this case, root rot can be avoided very easily.
For this method, you need to take any drug that stimulates the growth and development of the root system, and process the cutting with it. This event must be carried out in full compliance with the instructions.
Then you need to take the moss, soak it well with water for several hours, and wrap the petiole in it. If there are several petioles, then there should be a sufficient distance between them. In this case, the fabric also needs to be moistened, the petiole should be wrapped in it, and tied tighter with some kind of rope.
And then you need to wrap it well with foil. As for this case, the bundle with petioles should lie in a well-lit place, preferably on a windowsill.
You can also carry out cuttings of thuja with a wick... But this method requires much more time and increased attention from the gardener. In this case, the cuttings take root and almost everything takes root. Which is very different from previous breeding methods.
Rooting takes place in several stages.
- You need to take a plastic cup and make holes in its bottom.
- You need to stretch a string or rope into this hole.
- Drainage should be poured onto the bottom of the glass, and nutrient soil should be poured on top of it.
- The glass must be placed in a container with water.
- Several cuttings need to be planted in a glass.
- Cover the top of the glass with another glass so that the moisture does not evaporate.
After about a month, the petioles will give small roots. And in the fall, the seedlings can be transplanted into open ground.
If you propagate thuja by cuttings in the spring, then you can even do this in potatoes... But this must be done in full compliance with all conditions.
- The cut cutting should be placed in the stimulating solution overnight.
- Taking one potato, you need to completely cut out all the eyes from it.
- On top of the potatoes, you need to carefully pierce a hole no more than 5 cm deep.
- A handle must be inserted into the punctured hole, and this must be done as deeply as possible.
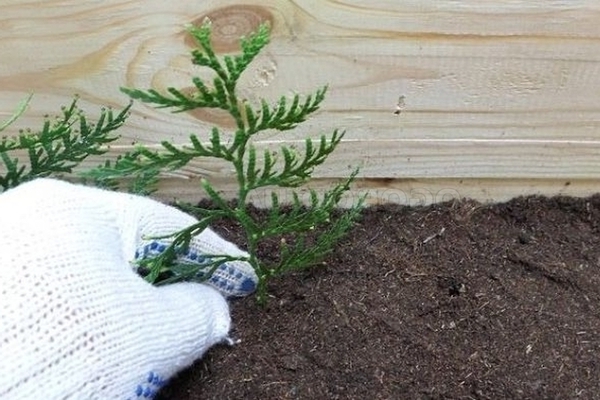
- After all this, the plant can be planted. It is necessary to prepare the holes in advance and be sure to pour fertilizer into them. In the case of thujas, humus is perfect.
- After planting, the hole with the plant must be well shed and covered with some transparent container, or just a bottle with a closed lid.
If you cut thuja in this way, then it will not give you any trouble at all. This method is practically the most effective of all. And all because the potatoes keep well in the lag. And the cuttings germinate directly into the ground and after transplanting they root much better in a new place.
Thuja care
No matter how it initially seemed that it is difficult to propagate thuja at home. Especially for beginners it seems almost impossible, in fact, everything is very simple. The main thing is, as elsewhere, proper care. There are only a few rules for this, but they must be followed. If everything is done correctly, then soon you will be delighted with beautiful conifers with an excellent, pleasant and healthy aroma.
After you have started propagating cuttings, the first roots begin to appear after a couple of months. At this time, you can not worry about the drying out of the roots. If the roots have already appeared, then you can monitor soil moisture much less than before.
After the roots appear, the plant is transplanted to the place where it will grow for the next 3 years. And only after that, the plants can be transplanted to a permanent place.
But first of all, you need to choose the place where the seedling will develop in the coming years. It should not be in direct sunlight. Before planting, it is simply necessary to add peat to this land and dig it up along with the earth.
The container in which the cutting grew must be well spilled with water. This is done in order to get the plants without damaging the roots.
In the open field, the distance between the seedlings should be at least 30 cm. After planting, the plant should be watered very well.
After planting, the rules of care are quite simple: watering should be regular, but there should be no weed in the vicinity. Otherwise, they will take away nutrients from the soil that are necessary for not yet matured plants.
And in a few years, when the seedlings gain strength, they can be transplanted to a permanent place and actively used in the design of your site.
All this time, thuja grow very slowly. And only when they are transplanted to a permanent place, they begin their active development. That is why you should not cut branches from them for the first two years. Over the years, the branches will actively develop and grow. And the plant itself will be much more magnificent.
But naturally, this does not happen immediately. And in order to get lush coniferous beauty on your site, several years must pass.
What problems can happen and how to deal with it
Rooting thuja is not so difficult. But at the same time, all conditions and recommendations must be strictly observed. Indeed, thujas, just like other plants, have diseases.
For example, white mold... It can be seen on thujas very often and there are several reasons for its appearance.
- A thuja seedling could be infected with a fungal disease.
- Initially, the plant was poorly treated with the necessary drugs, and the prevention was carried out superficially.
- Propagation by cuttings was carried out without treatment with stabilizers.
- The storage conditions for the cuttings were violated.
- The plant grows in high humidity.
When mold appears, the seedlings must be washed with water and well treated with a solution of potassium permanganate. When cutting cuttings, they need to be kept in a solution of ferrous sulfate for some time. And to prevent mold from reappearing, you need to store the cuttings in sand or a plastic container with air holes.
If the cuttings are thuj dry up, then they need to be moved to a dark place and treated with stimulants. It is carried out several times with an interval of 2 weeks, in principle, everything is indicated in the instructions.
Also, cuttings can dry out due to the fact that they are too close to each other. In this case, they simply do not have enough necessary and useful substances. That is why you should always keep track of the distance between plants.
In general, cuttings are the most popular and convenient, and most importantly effective, method of thuja propagation. How to propagate thuja by cuttings at home is quite simple to do. Therefore, you should never be intimidated by something without trying it.
In principle, thuja can be grown in a short time. There are many ways and techniques for this. But before you carry out any even the simplest procedure, you must first fully study it. This is necessary in order for you to succeed for sure. And after all not so complicated procedures, your plants delighted you with their beauty and health.

